Our Flight Planning Aerial Software, FlightPlanner, is an easy way to create an aerial photography flight plan within seconds. Using a streaming map of your choice (e.g., Google Maps) you can build a flight plan using polygons and paths. There are 4-quick steps to create a flight plan.

Build the Aerial Photography Flight Plan’s Dimensions

You can click on the map to start creating the shape/area of interest of your flight plan. Once you created the shape of your flight plan, you can begin selecting the camera you’ll be using for this flight plan. Below is an example using the polygon draw feature to create the flight plan’s shape in a desert landscape.

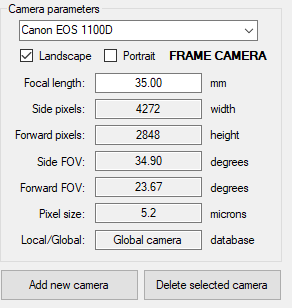
Set Camera Parameters

When selecting a camera for your flight plan, you can either select a pre-existing camera or create a new camera. When creating a new camera, you can input the following parameters to fit your camera’s specifications:

  • Focal length (in mm)
  • Side Pixels (width)
  • Forward Pixels (height)
  • Side FOV and Forward FOV
  • Pixel Size (in microns)
  • Local/Global (database)

NOTE: This covers only the polygon camera, imaging & misc. parameters, not the path parameters.

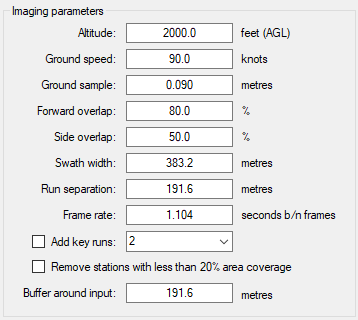
Imaging & Miscellaneous Parameters

After you selected your camera parameters you can adjust the following imaging parameters or variables which affect the imaging for this flight plan:

  • Altitude (AGL in feet)
  • Ground Speed (in knots)
  • Ground Sample (in metres)
  • Forward and Side Overlap
  • Swath Width (in metres)
  • And more…

    Interested in flight planning? Take a look at our FlightPlanner Software Guide

    Flight Line Calculation Method

    You’ll need to choose the flight line calculation method, this determines where your flight lines are placed (your plane’s flying path) within your flight plan and the line’s orientation, e.g., North to South or East to West flight direction.

    Flight Plan Generated in Seconds. Aerial Survey Flight Plan Explained

    Once the 4 previous steps are completed, FlightPlanner will begin generating the flight plan with your specified settings and display it on the map.

    This is what you should roughly see on your map, it’s a generated flight plan by FlightPlanner. The lines/dots all show crucial information about your new aerial photography flight plan.

    Line / Dot Description
    Yellow Lines Flight lines. Where your aircraft will travel along.
    Red Lines Key/Tie Runs. Additional flight runs which are perpendicular to the flight lines. Useful for adding geometric strength to images.
    White/Red Dots Camera Stations/Trigger Points. The positions along your flight lines where the camera will take an image.
    Green Polygon Area of Interest. The shape of your flight plan. What area the user wants to survey.
    Blue Polygon Buffer Area. The area which is extended from your area of interest. Used to increase the accuracy of your images.
    Purple Outline Complete Area of Coverage. The extent of where your images will reach in the given area.

    FlightPlanner makes it visually easy to see what your flight plan looks like and gives you additional features to make adjustments to your plan. These features include adjusting a flight plan’s height, the speed of your aircraft during the flight, and much more.

    You can export a flight plan you created from FlightPlanner into our Aviatrix flight management system. This easy and quick integration between our software gets you aerial surveying in no time.

    Try our 4-week free FlightPlanner trial, or contact us for more information

    Contact UsRequest a Trial

    Go Back to FlightPlanner

    Back to FlightPlanner