How does our aerial mapping software flight management system help you?
The Aviatrix system is helping many aerial surveyors in manned aircraft achieve great image mapping accuracy with ease.
Because of its lightweight system and intuitive user interface, you’ll be able to run and finish aerial surveys within a few simple steps.
Aviatrix hardware setup screen
Once Aviatrix is successfully installed on the pilot’s windows device, you’ll be shown a prompt box after opening the software.
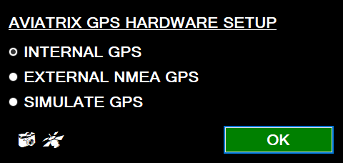
You’ll be given the option to choose what GPS your Aviatrix software will be running.
- Internal GPS
- External NMEA GPS
- Simulate GPS
We’ll be covering the “internal GPS” option since that is the option, which is generally used while surveying with standardised AeroScientific’s FlightCube.
NOTE: The device’s screen should be easily viewable and in arm’s reach of the pilot when flying.
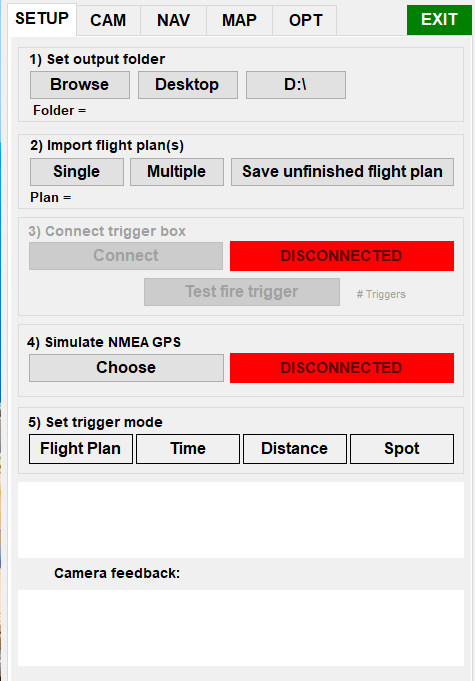

Set output folder
Under the ‘Set output folder’ option, you can choose where the images will be stored on their device. Either on the DESKTOP, main drive (in this case D:\ drive), or anywhere on your computer using the Browse option.
Import flight plans
Aviatrix running under a flight plan is one of its most basic important functions. The flight plan shows crucial information to the pilot about when and where to turn, at what angle, and also automatically triggers the camera to take images at specific locations based on your GPS, etc.

- The “SINGLE” option will open the directory to select a flight plan.
- The “MULTIPLE” option will open the ‘Browse for folder’ directory, allowing you to search for multiple flight plans.
NOTE: The Aviatrix software accounts for landscapes in the world with varying terrain heights. You must import a DEM (digital elevation model) file which corresponds with the flight plan you’re using for this feature to work.

Cam trigger box set
The trigger box is responsible for triggering the connected camera to acquire images. After the trigger box hardware is connected to the device and the output folder has been chosen, Aviatrix will automatically connect to the camera trigger box.
When a trigger box is connected the CONNECT option will appear in green. When disconnected the DISCONNECT option will appear in red. The TEST FIRE option triggers the camera to acquire a single image and store it in the output folder.
Trigger mode set
You select the mode required for triggering the camera from four options.
- Flight Plan: Triggers the camera to take photos based on the flight plan’s trigger points
- Time-based: Triggers the camera-based off a specified time interval which you can specify in the “OPTIONS” tab
- Distance-based: Triggers the camera-based off a metre setting which is located in the “OPTIONS” tab
- Spot: Triggers the camera based on points along a chosen path. This option is used to grab single images in specific locations, where the user is disregarding combining multiple images

Setting up the camera
The Camera tab displays information on whether cameras are connected or not. After selecting the CONNECT option, you will be presented with a drop-down list of camera control options.
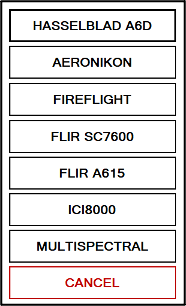
Once you’ve chosen your preferred camera, Aviatrix will display a message reading ‘Connected to Camera Control 1!” This indicates that the camera control connection has been successful.
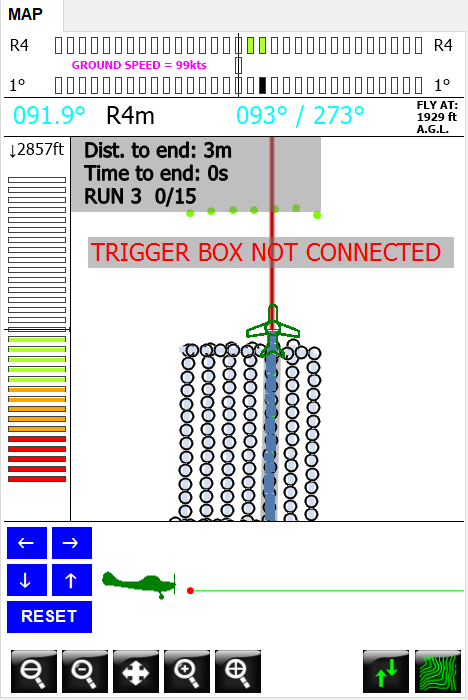
It’s time to do aerial mapping!
After that navigate to the MAP tab. This tab presents the crucial aerial mapping information about your flight plan as well as the aircraft’s position to it.
With this simple user interface based on the internal GPS, the pilot can see their aircraft’s altitude, bearing according to the flight plan’s flight lines, their position relative to the aerial survey location, amount of time until they’ve reached the end of their currently flown flight line, and much more.
Other features
Our aerial mapping software is listed with many other helpful aerial photography features, such as:
- Allowing the aerial surveyor to modify their flight plan mid-flight
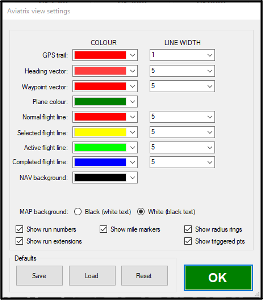
- Adjusting colour of the user interface
- Adjusting when trigger points should be set
- The ability to create a new flight plan entirely
- Assisting the pilot with visual cues to correct their flying altitude
- And much more
Trial Aviatrix, our aerial mapping software flight management system!
Aviatrix has so many more features, click here to find more information.
Aviatrix also uses a piece of hardware called a trigger box that sits between the computer and the camera which controls the trigger to capture images. For more information about this trigger box, click here.
If you want to make aerial mapping easy, please contact us if you would like an obligation-free trial of the Aviatrix flight management system.